 Your success in fishing has a lot to do with your bait. How would you lure fish if your bait isn’t attractive enough, right? On many occasions, worms are the best kind there is.
However, they can be quite bothersome to source so you might want to learn how to raise worms for fishing instead.
Sure, if you don’t have to use them very often, the cost and hassle of sourcing them wouldn’t be an issue. However, if you need to use them often, it would be more economical to just grow worms at home for fishing.
While this task isn’t as easy as many would like, it’s also not that difficult to do. To help you get the results you need, here are the easy steps on how to raise worms for fishing.
How to Grow Worms for Fishing
Step 1: Choose the Best Kind of Worm for the Job
The first step that you need to do if you’re going to learn how to grow worms for fishing bait is to choose which kind of worm you should cultivate. There are a few different options to choose from and it’s crucial to choose wisely to ensure best results.
There are three popular options for fishing worms (mealworms, European nightcrawlers, red wigglers) and each have their own benefits. Most anglers choose based on their past experiences.
If you don’t have a lot of experience working with them just yet, it’s crucial to get to know them better before making a choice. Here’s a quick comparison of the three that can help you choose which one to grow.
| Type of Worm | Image | Pros | Cons |
|---|---|---|---|
| Mealworm | 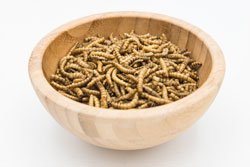 |
|
|
| European Nightcrawlers |  |
|
|
| Red Wigglers | 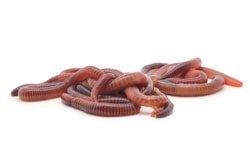 |
|
|
Take note that your choice of worm will affect the growing process you should follow. You should be quite particular and pay attention to the special requirements of some worms if you want them to reproduce nicely.
This is particularly true if you want to raise nightcrawlers for fishing bait as they have some demands that you absolutely need to adhere to if you want them happy, healthy, and reproducing.
Step 2: Gather the Materials You Need
 Once you have decided which kind of worm you want to grow, the next thing you need to do is to gather the materials you need to start your worm bed. Buy your choice of worm and round up the following items as well:
- A sizable bucket or plastic container to house the worm bed securely. You can use a foam or plastic container for the job. Foam is recommended, however, for its insulation capabilities.
- Shredded paper, preferably used paper so you can also recycle some waste from your home. You can use discarded thin cardboard, old newspaper, or used printer paper without color print. Shred or tear them to small pieces using a shredder or just your hands.
- A good amount of well-balanced potting soil.
- A drill or something pointy to make holes in the container with.
- A batch of starter live worms. The amount you need to order depends on the size of your container. The ideal amount for a starter batch is 2 dozen worms for every square foot of space.
Step 3: Pick the Right Location for the Worm Bed
You can place your worm bed either indoors or outdoors but it would be best to keep it outside. While keeping it indoors will make it easier for you to control the temperature within the compost, the worm bed can emit foul odors and worms can escape from the container regularly.
So if you can find a nice spot in your backyard for the worm bed, it’s better to put it there.
What makes a spot perfect for a worm bed? Here are a few things to look for:
- With plenty of shade or even covered so the worm bed will not be exposed to rain. The area should be cool and away from sunlight and heat. If you’re going to grow European Nightcrawlers, you might want to place the container somewhere dark so the worms don’t have to bury themselves too deep into the bed.
- Not susceptible to freezing during the winter months. If there’s no such place in your backyard, be ready to move the worm bed indoors during the cold months (if you wish to grow them all year round).
Step 4: Prepare the Container
 Drill holes into the bucket or container that will hold your worm bed. Place them on the top and bottom of the container. Keep the holes small to prevent the worms from escaping. Don’t use drill bits bigger than 3⁄8”.
If you’re placing your worm bed indoors, there are two additional requirements for the container:
- It should have a lid. Do not forget to also drill small holes in them for ventilation.
- Make sure that there’s another container underneath it to catch excess water. This will prevent the worms from drowning and will keep your floors from getting gross.
Step 5: Assemble the Worm Bed
Here’s a step-by-step guide in putting the worm bed together:
- Place a half inch thick layer of shredded paper in the bottom of the container. Make sure that the paper is evenly distributed.
- Put in about 3-8 inches of potting soil. Make sure that the layer is nice and even as well so break down the peat moss if there are clumps.
- Thoroughly dampen the worm bed using a water hose. Avoid going overboard as it might drown the worms.
Step 6: Place the Worms in the Container
Place your starter batch of worms in the container evenly and gently.
Step 7: Maintain the Proper Conditions for Your Worms’ Growth
To ensure the good health and their odds of proliferation, maintain the optimal conditions in your worm bed.
- Keep the temperature above freezing – ideally at about 50-80°F. Using heat lamps may be necessary if the worm bed is placed in a cold area.
- Keep it away from direct sunlight.
- Replace the bedding material every couple of months. When the material is increasing inside the container, move the worms to a temporary holder, then, scoop out the old bedding then replace it with a fresh batch before putting the worms back in.
- Keep the soil moist by pouring some water into it every now and then.
Step 8: Fatten Up the Worms
 You’ll want your worms fat and juicy so they can attract fish better. To do this, you have to feed them well. Here are some of the items you can feed them:
- Organic food waste like coffee grounds, skins of vegetables and fruits, bran, and egg shells.
- Other biodegradable materials like rabbit manure.
- Actual food like powdered milk, chicken mash, and cornmeal.
- Commercially available worm food.
Frequent feedings will help fatten up the worms nicely. However, also make sure to give them enough space so they can grow in size.
Other Reasons to Grow Worms for Fishing Bait
Feeling a bit overwhelmed with all of the things that you need to do in order to grow worms for fishing bait? That’s perfectly understandable. Those really are quite a lot of steps to go through just so you can save on the costs and skip the hassle of buying live bait from the store.
However, if the practicality of this chore doesn’t convince you to give this method a shot, its benefits for your gardening efforts might do the trick.
Growing worms will let you create a worm compost that can then help make your plants grow better and healthier and will help you cut down the waste you send to landfills.
Worms are considered as ‘free farm help’ by agriculturists and expert gardeners so having them in your backyard can be very beneficial for your plants.
Conclusion
Now that you have learned how to grow worms for fishing, it’s easier to see that the task isn’t as tough as it initially looked.
It’s just like having pets or doing some recycling. And with the many benefits that it comes with, it’s definitely worth the effort.


